Pages

Friday, July 20, 2018

Forensics Quickie: Identifying an Unknown GUID with Shellbags Explorer, Detailing Shell Item Extension Block 0xbeef0026, & Creative Cloud GUID Behavior

FORENSICS QUICKIES! These posts will consist of small tidbits of useful information that can be explained very succinctly.

I ran into an unknown GUID while using Shellbags Explorer (SBE) recently. Here's what I did to confirm what it was -- with some testing and new findings along the way. All of this was done on Windows 10. Thanks to Eric Zimmerman and Joachim Metz for quick response times and details.

An unmapped GUID in SBE.

Scenario
You have an unknown GUID. You have an idea of what it is, but want to confirm.

The Solution
I had an inkling that this GUID was related to Adobe Creative Cloud. Usually, you'll be able to see some folders under the unknown GUID within SBE that are specific enough to pinpoint the application responsible -- doubly so if you're analyzing your own machine and can recognize the folders. With Creative Cloud in mind, let's confirm.

First, boot up a testing virtual machine and install the Adobe Creative Cloud Desktop application. The free Microsoft VMs for IE/Edge testing are useful for this.

Installing and updating the Adobe Creative Cloud desktop application.

Upon installation of the application and sign-in, we can see that a new library called "Creative Cloud Files" shows up in the Windows Explorer sidebar (the default location of the folder is in the root of the user's profile).

 
Observing new "Creative Cloud Files" library added to Explorer sidebar.

Before interacting with this folder, let's do a sanity check baseline on what our UsrClass.dat looks like in SBE. At this point, we shouldn't see any shellbags entries for this location.

 
Recursive view of shellbags entries within SBE. No "Creative Cloud Files" entries. 

As expected, there are no entries for the "Creative Cloud Files" location. But before we move on any further, let's grab the timestamps (standard information) for the directory. This will be important later.

 
FTK Imager Lite showing MACE times for the "Creative Cloud Files" folder.

Now that we've noted those timestamps, let's interact with the folder.

 
Interacting with the "Creative Cloud Files" folder via Windows Explorer.

There should now be a shellbags entry for this folder in the user's UsrClass.dat. Pull that, along with its .LOG files (if necessary), and open it up with SBE.

Observing the shellbags entry for the "Creative Cloud Files" folder with SBE.

Looks like we got what we came for...but we're not done just yet.

After running this same test on another Windows 10 machine, I noticed something strange: the last section of the GUID wasn't the same.

0e270daa-1be6-48f2-ac49-6117167f7994

Typically, these GUIDs will stay consistent from system to system, since most of the ones you'll come across during shellbags analysis are built-in Known Folder GUIDs. But it turns out that software vendors can extend this set of known folders by registering their own [6] [7].

While the final section of the GUID seems to be different on each machine, the first sections (0e270daa-1be6-48f2-ac49) seem to have remained consistent since at least 2015 (Google it).

With that out of the way, let's dig deeper into the actual makeup of the unmapped GUID entry, out of curiosity. I happened to notice that the unmapped GUID entry looked very similar to the existing "Dropbox" entry on another test machine (for which the GUID was mapped). As I compared the two, I noticed that there were three Windows FILETIME timestamps in both of them. I couldn't find any explanation for these, so I referenced Eric Zimmerman's "Plumbing the Depths: ShellBags" presentation and Joachim Metz's Windows Shell Item format specification.

Using SBE's data interpreter to identify three FILETIME timestamps.

Eric's and Joachim's documentation were invaluable for walking through the hex. They serve as perfect foundations for digging into the file formats. Still, I wasn't able to determine why I was seeing three timestamps instead of the two that were showing in the "Details" tab. And I wasn't seeing a 0xbeef0026 extension block in the specification or any reference to it when the class type indicator for the entry is 0x1f (a root folder shell item).

With this information in hand, it was time to start piecing it all together.

If we take a look at the above animation, as well as the timestamps of the "Creative Cloud Files" folder that we pulled with FTK Imager earlier, you'll notice that the FILETIME timestamps in the shellbags entry match up exactly with the SI MACE times of the "Creative Cloud Files" folder at the time we interacted with it.

By creating a color coded template of this entry, we can come close to attributing every byte of the entry to something including the timestamps:

Hex of unmapped "Creative Cloud Files" shellbags entry
0000 0000:  3a 00 1f 42 aa 0d 27 0e  
0000 0008:  e6 1b f2 48 ac 49 61 17 
0000 0010:  16 7f 79 94 26 00 01 00 
0000 0018:  26 00 ef be 11 00 00 00 
0000 0020:  5e bf 26 f7 bf 1f d4 01
0000 0028:  3e 9b 02 f8 bf 1f d4 01 
0000 0030:  39 10 8c fb bf 1f d4 01 
0000 0038:  14 00 00 00

Offset 0x00: Shell Item Size (42d)
Offset 0x02: Class Type Indicator (0x1F - Root Folder Shell Item)
Offset 0x03: Sort Index (Libraries)
Offset 0x04: GUID (0e270daa-1be6-48f2-ac49-6117167f7994)
Offset 0x14: Extension Block Size (38d)
Offset 0x16: Extension Version (?)
Offset 0x18: Extension Block Signature (0xbeef0026)
Offset 0x1C: ????
Offset 0x20: Windows FILETIME 1 (Creation)
Offset 0x28: Windows FILETIME 2 (Last Modified)
Offset 0x30: Windows FILETIME 3 (Last Accessed)
Offset 0x38: ????  

The bottom line is that, by performing behavioral analysis and walking through the file format at the hex level, we were not only able to find what the unknown GUID maps back to, but we were also able to (a) identify a set of SI MACE FILETIMEs for an undocumented extension block (0xbeef0026) and (b) determine that software-vendor-generated/registered GUIDs may not be consistent all the time (at least the last section, in this example).

The larger question is: are the inconsistent GUIDs we see specific to Creative Cloud or are there more instances of this inconsistency? Every "Creative Cloud Files" GUID I have seen -- from three different machines tested -- show a different end-section of the GUID. Dropbox seems to have consistent GUIDs across machines. Could Creative Cloud be generating the end-section of the "Creative Cloud Files" GUID based on something inconsistent like username?

And just like that, we have another hypothesis that we can test. Using the same VM from before, I created a new user and gave it the same name as a user on one of my other test machines. After signing in using the Creative Cloud desktop application, the new "Creative Cloud Files" folder was created for my new user account. Following the same steps as above, the shellbags entry was created for it, and it was observed that the GUIDs (including the last section) for the "Creative Cloud Files" location on two different machines, using the same username, were the same!

If you were to create a user named "IEUser" on your machine, and run through this whole process, you'll find that the GUID for "Creative Cloud Files" will be 0e270daa-1be6-48f2-ac49-6117167f7994. Likewise, for the "4n6k" user, you'll find the GUID to be 0e270daa-1be6-48f2-ac49-fc258b405d45. Also, this is case insensitive, so user "4N6K" will result in the same GUID.

With that said, it may be necessary to match the "Creative Cloud Files" location (and any other application GUIDs that exhibit the same behavior) to the first few sections of the GUID (0e270daa-1be6-48f2-ac49-) instead of the whole thing.


-4n6k


References
1) https://docs.microsoft.com/en-us/windows/desktop/shell/known-folders
2) https://ericzimmerman.github.io/
3) https://developer.microsoft.com/en-us/microsoft-edge/tools/vms/
4) https://www.adobe.com/creativecloud/desktop-app.html
5) https://docs.microsoft.com/en-us/windows/desktop/shell/knownfolderid
6) https://docs.microsoft.com/en-us/windows/desktop/shell/how-to-extend-known-folders-with-custom-folders
7) https://www.winhelponline.com/blog/add-custom-folder-this-pc-navigation-pane-windows/
8) https://www.sans.org/summit-archives/file/summit-archive-1492184337.pdf
9) https://github.com/libyal/libfwsi/blob/master/documentation/Windows%20Shell%20Item%20format.asciidoc

Sunday, January 14, 2018

Forensics Quickie: Methodology for Identifying Linux ext4 Timestamp Values in debugfs `stat` Command

FORENSICS QUICKIES! These posts will consist of small tidbits of useful information that can be explained very succinctly.

I saw this tweet from @JPoForenso recently.

Archived tweet here.

I didn't know what this was either, so I began testing. And as always, remember that it's one thing to know that an artifact exists; it's another to know how to find, understand, and make use of it. This is more of a methodology post related to problem solving, but having the logic behind the approach is typically pretty useful.

So, from start to finish, let's delve into how you'd go about answering the question Jonathon posted.

Scenario
You want to determine what a specific part of the debugfs `stat` command refers to (but this process can be applied to any other Linux command!).

The Solution
My first thought on how to approach this question was to see if we could get lucky by looking at readily available source code. Since verifying program behavior from source code has proven to work several times in the past, it doesn't hurt to look in this instance. So, knowing that the Linux kernel is open source, I first Googled something fairly simple, just to see what I'd get:

Googling "debugfs stat source code"

The first result is what seems to be the stat.c source file, related to the standard `stat` Linux command. It's not exactly what I want, but it's close enough for now. As we open the link, we can see a bunch of Linux kernel versions on the left sidebar. I didn't know what kernel version I was running on my Ubuntu virtual machine, so I ran a `uname -or` via command line to find out.

Running `uname -or` to get the operating system and Linux kernel version

Looks like I'm running kernel version 4.10.0-42-generic. Since I'm going to be running my tests on this Ubuntu VM (I already had a clean snapshot), I'd like to make sure I'm reading the stat.c source code for the closest kernel version I can get. And since we have the luxury of picking the version of the source code using this first Google search result, I'm going to go ahead and select version 4.10 from the left sidebar on the page (direct link here).

Looking at the source code, I can already see that it has a lot of the same strings that we see in Jonathon's screenshots (and just by using the `stat` command in the past) -- namely, I can see references to atime (access time), mtime (modify time), and ctime (change time).

stat.c source code showing references to relevant timestamp variable names

As I Ctrl+F for "ctime" within this source file, I noticed something at line 389: the added "nsec."

stat.c source code showing references to "sec" and "nsec". Possibly referring to nanoseconds

As I looked back at Jonathon's screenshots showing the output of both the debugfs's `stat` command and the standard `stat` command, I noticed that the standard command was showing the timestamps with nanosecond granularity. The theory at this point was that the characters after the hex bytes and the colon were probably the encoded nanoseconds value. To confirm this, I ran some tests.

I needed to further ensure that my setup was the same as Jonathon's; I needed to make sure my Ubuntu VM was using an ext4 file system. First, I ran `sudo fdisk -l` to list the disks and partitions present on my VM.

`fdisk -l` output showing /dev/sda1 as the boot partition and that it is of type 0x83.

We see that /dev/sda1 is our boot partition, that it is the largest partition, and that it is of type 0x83. Brian Carrier's "File System Forensic Analysis" book tells us in Table 5.3 (Chapter 5 > DOS Partitions) that a partition ID of 0x83 is, in fact, a Linux partition. But as this web page suggests:

"Various filesystem types like xiafs, ext2, ext3, reiserfs, etc. all use ID 83. Some systems mistakenly assume that 83 must mean ext2."

Therefore, this is not enough information and we will need to learn something new. With some quick Googling, we can see that the `df -T` command will get us the information that we need to confirm we're running an ext4 file system.

`df -T` output showing that /dev/sda1 is running an ext4 file system

Now that we know our setup more or less matches the original, let's run a quick and dirty test to get a feel for what Jonathon was doing. First, I'm going to do a quick `ls -la` in my home directory to see what existing file I can use to run a standard `stat` against. I found a file called ".xsession-errors". We'll use that. I then run the standard `stat`.

Standard `stat` command output of a file showing nanosecond granularity

Running a standard `stat` (stat /home/b/.xsession-errors) gives us the following that we will jot down for later:

Access: 2018-01-14 17:59:51.272474556 -0800
Modify: 2018-01-14 17:59:52.632462056 -0800
Change: 2018-01-14 17:59:52.632462056 -0800


Now, let's run the debugfs `stat` command on the same file and see what we get.

Before running the debugfs `stat` command

Note that, to use the debugfs `stat` command, you need to first specify the file system you want to use with the -w option. Since we already ran an `fdisk -l` before, we already know that we need to specify /dev/sda1. So we run `sudo debugfs -w /dev/sda1`, we will then get a debugfs prompt where we will run our `stat` command: `stat /home/b/.xsession-errors`. Also note that you can run the `stat` command against an inode or the full path of a file (as I did here) within the specified file system.

Output of the debugfs `stat` command, showing encoded timestamps

Let's go ahead and jot down the relevant lines of this output:

ctime: 0x5a5c0b18:96ca6ba0 -- Sun Jan 14 17:59:52 2018
atime: 0x5a5c0b17:40f686f0 -- Sun Jan 14 17:59:51 2018
mtime: 0x5a5c0b18:96ca6ba0 -- Sun Jan 14 17:59:52 2018
crtime: 0x5a5c0b17:40f686f0 -- Sun Jan 14 17:59:51 2018


(An off-topic tidbit here is that we see a "crtime," which is the "born/creation time" of the file being queried; ext file systems prior to ext4 did not support this).

Jonathon already identified the first section of hex bytes (before the colon) to be the Unix epoch representation of each timestamp. Let's confirm using TimeLord.

Using TimeLord to decode the first section of a debugfs `stat` command timestamp

As we can see, Jonathon is correct; the first section of the debugfs `stat` timestamp is the Unix time timestamp (remember, my Ubuntu VM is set to Pacific time (-8), so you must apply the offset to get it to match).

But what about the second portion? That's the real question! Knowing what we know already, we have some really good reasons to believe that the second portion of the debugfs timestamp is the nanoseconds value: we saw references to possible nanoseconds in the source code, we confirmed nanosecond granularity in the standard `stat` command, and the modify and changed times are the same using both `stat` commands.

But how do we confirm this? Well...let's try Googling it.

Googling "ext4 debugfs nanoseconds"

With our testing, we were able to search more effectively for what we needed. And this time, it really paid off -- there's already an answer for us! In fact, the answer goes one step further and even links us to one of Hal Pomeranz's "Understanding EXT4" articles that walks us through the ext4 timestamp format in-depth. I would highly recommend reading the full series, but to answer our initial question, we do not need to look further than the "Fractional Seconds" portion of Hal's post.
"The hex value of the create time "extra" is 0x148AF06C, or 344649836. But the low-order two bits are not used for counting nanoseconds. We need to throw those bits away and shift everything right by two bits- this is equivalent to dividing by 4. So our actual nanosecond value is 344649836 / 4 = 86162459."
Hal explains that the second part of the debugfs `stat` timestamps (after the colon) need to be divided by 4 after being converted to decimal. So let's try that with our example. The values for each stat command are replicated below (we'll only use the access and modify times since there are only 2 unique timestamps among the four total timestamps for the .xsession-errors file).

Standard `stat` command
Access: 2018-01-14 17:59:51.272474556 -0800
Modify: 2018-01-14 17:59:52.632462056 -0800


debugfs `stat` command
atime: 0x5a5c0b17:40f686f0 -- Sun Jan 14 17:59:51 2018
mtime: 0x5a5c0b18:96ca6ba0 -- Sun Jan 14 17:59:52 2018


0x40f686f0 (hex) --> 1089898224 (decimal) / 4 = 272474556
0x96ca6ba0 (hex) --> 2529848224 (decimal) / 4 = 632462056

We convert hex to decimal, then divide by 4, and we get the nanoseconds value!

With that, we've answered the question and learned a thing or two. Again, this was more of an exercise in problem solving and verification, but knowing how to go about solving a problem is something that you can apply to any question you may have.


-4n6k


References
1) http://archive.is/QTcR7
2) https://twitter.com/4n6k/status/909140358763892737
3) https://en.wikipedia.org/wiki/Debugfs
4) http://www.4n6k.com/2014/03/forensics-quickie-verifying-program.html
5) http://www.4n6k.com/2017/11/forensics-quickie-identifying-clear.html
6) http://elixir.free-electrons.com/linux/latest/source/fs/stat.c
7) https://linux.die.net/man/1/uname
8) https://www.win.tue.nl/~aeb/partitions/partition_types-1.html
9) https://linux.die.net/man/1/df
10) https://en.wikipedia.org/wiki/Unix_time
11) http://computerforensics.parsonage.co.uk/timelord/timelord.htm
12) https://unix.stackexchange.com/a/225181/221250
13) https://digital-forensics.sans.org/blog/2011/03/14/digital-forensics-understanding-ext4-part-2-timestamps

Thursday, November 2, 2017

Forensics Quickie: Methodology for Identifying "Clear Recent History" Settings for an Old Version of Firefox

FORENSICS QUICKIES! These posts will consist of small tidbits of useful information that can be explained very succinctly.

I saw this tweet from @phillmoore recently.

Archived tweet here.

Further down in this thread, we also see that the target browser is a ~5 year old version of Firefox. I've written in the past about verifying program behavior using source code. In fact, the previous post uses Firefox as an example. Given the information that we have -- and even though this is somewhat of a fringe case -- let's run through how to get the answer. Remember: it's one thing to know that an artifact exists; it's another to know how to find, understand, and make use of it

So, from start to finish, let's delve into how you'd go about answering the question Phill posted.

Scenario
You want to determine where an older version of Firefox stores the settings for the "Clear Recent History" dialog.

The Solution
First, we need to identify a version of Firefox that is about 5 years old. Mozilla hosts a page that lists all past releases of Firefox and links each to their respective release notes -- including the dates of release. Clicking around a bit, I found that Firefox version 17.0 was about 5 years old (Nov 2012).

With that out of the way, I needed to locate the source code and compiled executables archive for past releases. Googling brought me to Mozilla's "Downloading Source Archives" page. There are tons of ways to download the source, but I wanted a quick and easy way, so I navigated to: https://archive.mozilla.org/pub/.

Following down the index, I found what I needed at:
  • https://archive.mozilla.org/pub/firefox/releases/17.0/source/
    • firefox-17.0.source.tar.bz2
and
  • https://archive.mozilla.org/pub/firefox/releases/17.0/win32/en-US/
    • Firefox Setup 17.0.exe

Now that I have the v17 source code and installer, I can start testing. I'm targeting the "Clear Recent History" dialog, so I install Firefox v17 on a clean VM, and use the "Firefox" tab within the browser to navigate to History > Clear Recent History...

Default "Clear Recent History" Dialog for Firefox v17.

I'd like to find where the logic for this dialog is located within the source code. To make that easier, I need to grab a fairly unique string from this dialog -- one that won't come back with a lot of hits across many different source files. "Time range to clear" seems unique enough, so let's go with that.

There are many different ways to go about searching the extracted source code, but since I'm on Windows and want to run a quick and dirty search across many files, I'll just use AstroGrep.

Using AstroGrep to recursively search Firefox source code for a unique string.

I provide my search path that contains the source code, define my search string, and perform the search recursively across all file types. The results show two files that contain my unique string. The sanitize.dtd file sounds interesting, so let's open that one up.

Contents of "sanitize.dtd" showing our unique string along with some other context.

The first hit for our unique string can be seen at line 12. By looking around this area, we can gather some clues in order to pivot to other files that have more meat to them. Particularly interesting are lines 5 and 6. I'm looking for the settings within the dialog titled "Clear Recent History," so let's run an AstroGrep search for "sanitizeDialog2."

Using AstroGrep to recursively search Firefox source code for "sanitizeDialog2."

Again, the search string is unique enough to cut down on the amount of results we need to review. The file named sanitizeDialog.js seems to be what we're looking for here.

Contents of "sanitizeDialog.js" showing our searched string.

Line 64 shows our searched string. It also looks like we have something more than just localization and property data in this file. Browsing through this file would probably be a good idea.

Contents of "sanitizeDialog.js" showing the sanitize() function.

Line 100 contains the beginning of the sanitize() function and references the updatePrefs() function. A few lines down, we see what that's all about.

Contents of "sanitizeDialog.js" showing the updatePrefs() function.

The updatePrefs() function provides even more clues. It gets the timespan that the user sets within the dialog and hints at what we saw on line 105: the prefDomain of "privacy.cpd." We see "downloads" and "history" tacked on to that string, which leads me to believe that we're getting really close.

An AstroGrep search for "privacy.cpd" finally leads us to our destination.

Using AstroGrep to recursively search Firefox source code for "privacy.cpd."

The very first result, firefox.js, shows a few lines that not only contain "privacy.cpd," but also some familiar labels. These labels more or less line up with the checkboxes we saw in our "Clear Recent History" dialog at the beginning of this post. It gets even more interesting as we review the contents of firefox.js.

Contents of "firefox.js" showing the default "clear history" values and time span values.

As we can see, the source code is set up to check some of the items in the dialog by default. There are some other interesting lines here, but we'll get to that in a minute. What really caught my eye was line 495. Having done some research on Firefox proxy settings in the past, I knew that those settings were stored in the prefs.js file located in Firefox profiles. Couple that with the location of the firefox.js file within the source code folder structure (C:\4n6k\firefox-17.0.source\mozilla-release\browser\app\profile), and there's a really good chance all of what we need is in our profile's prefs.js. (which is typically located at C:\Users\4n6k\AppData\Roaming\Mozilla\Firefox\Profiles\<RandomChars>.default).

We can test this theory by performing a set of actions (as a normal user would) and documenting the results.

Test #01: Perform a default "Clear Recent History"

The first test was to open Firefox v17 on a VM that did not have Firefox already installed and clear the history using the default values within the dialog.

Here's what a default "Clear Recent History" action looks like on Firefox v17:

A default "Clear Recent History" action on Firefox v17. No settings were changed.

By default, the time range is set to "Last Hour," and the "Browsing & Download History," "Cookies," "Cache," and "Active Logins" checkboxes are selected. The "Offline Website Data" and "Site Preferences" checkboxes are not selected.
Note: prefs.js - Complete Re-write Upon Exit

Upon hitting the "Clear Now" button, Firefox (at least in the case of v17) must be closed in order for us to accurately test changes to the prefs.js file. The prefs.js file gets written to upon closing the application. And, per the warning at the top of the file, the entirety of the file will get re-written upon application exit. In other words, the born time and last written time get updated upon Firefox's exit; it is a brand new file. Every prefs.js file in these tests was acquired after application closure.


A quick comparison of the two prefs.js files using Beyond Compare shows very few changes. None are relevant to what we're testing.

Using Beyond Compare to compare two prefs.js files. No relevant differences are seen here.

Test #02: Perform a default "Clear Recent History" after form data input

In the previous test, the "Form & Search History" checkbox is grayed out. I wanted to test the default history clear while that checkbox was enabled, so I browsed to Twitter and logged in. That was enough to save some form data for the username field.

A default "Clear Recent History" action on Firefox v17 with form data present.

Note that I did not check the "Form & Search History" checkbox. It was checked by default after some form data was introduced. This variance did not show anything new; there was no relevant change in the prefs.js file.

Using Beyond Compare to compare two prefs.js files. No relevant differences are seen here.

Test #03: Perform a "Clear Recent History" with all boxes selected + 2hr time span

For this test, a few websites were browsed, form data was input, all checkboxes were selected, and the "time range to clear" was changed from the default "1 hour" to 2 hours.

A modified "Clear Recent History" action on Firefox v17. All boxes are selected and time span is changed..

With these changes, we finally see some relevant items get written to the prefs.js file.

Using Beyond Compare to compare two prefs.js files.Some relevant differences are detected.

We see the following get written:
  • user_pref("privacy.cpd.offlineApps", true);
  • user_pref("privacy.cpd.siteSettings", true);
  • user_pref("privacy.sanitize.timeSpan", 2);
Also note the "2" value after the timeSpan line. Remember: the value at that position is defined in the source code:
  • 0 - Clear everything
  • 1 - Last Hour
  • 2 - Last 2 Hours
  • 3 - Last 4 Hours
  • 4 - Today
Test #04: Perform a "Clear Recent History" with first box selected + 4hr time span

For this test, a few more websites were browsed, form data was input, all checkboxes were deselected except for the first one (unchecking everything will gray out the "Clear Now button"), and the "time range to clear" was changed from the default "1 hour" to 4 hours.

A modified "Clear Recent History" action on Firefox v17. Only one box is selected and time span is changed..

With these changes come more changes in the prefs.js file.

Using Beyond Compare to compare two prefs.js files.More relevant differences are detected.
 
The key is to understand that if something deviates from the default "Clear Recent History" settings, there will be an entry for it in the prefs.js file. Note that this recent change caused entries to show up for cache, cookies, formdata, and sessions. This is because they have been switched to the opposite of what the default settings are set to. As an example, cache is checked in the default settings. When it is unchecked, it deviates from the default, and therefore, Firefox needs to make note of it in prefs.js. Likewise, "Offline Website Data" (aka offlineApps) is NOT checked in the default settings. When it is checked, it deviates from the default, and therefore, Firefox needs to make note of it in the prefs.js.

One final anecdote is that the checkboxes and time span within the "Clear Recent History" dialog do not get updated/saved until you click the "Clear Now" button (at least in the case of v17). That is, if you check/uncheck items or change the time span value and hit cancel, your settings will not be persistent -- neither in the current session nor the prefs.js file.

With that, we now have a better idea of how one of the many facets of Firefox operates. There is much, much more there (especially in prefs.js), but testing specific functionality in depth goes a long way in understanding how things work.

If there's one takeaway from all of this, it's to make sure you're leveraging what is available. If you have source code to look through, identifying the behavior of a given application can be a walk in the park. 

...unless it's written in Perl.


-4n6k


References
1. Reference to Original Tweet 01
2. Forensics Quickie: Verifying Program Behavior Using Source Code (by 4n6k)
3. Reference to Original Tweet 02
4. Mozilla Firefox Release Notes Archive
5. Downloading Source Archives (Mozilla)
6. Firefox Source Code Archive
7. AstroGrep Homepage


Wednesday, February 1, 2017

Forensics Quickie: Accessing & Copying Volume Shadow Copy Contents From Live Remote Systems

FORENSICS QUICKIES! These posts will consist of small tidbits of useful information that can be explained very succinctly.

----------------------------------
[UPDATE #01 02/02/2017]: It looks like there's a command line utility to determine what the @GMT path is for previous versions of files/folders called volrest. Worth looking into if you want to find the proper path to use more easily than using vssadmin. Here's another post about it.
----------------------------------

I've seen some chatter about this tweet recently:


Essentially, it's about being able to access and copy files out of Volume Shadow Copies (VSCs) from live systems remotely. There seems to be some confusion related to how this is done. Specifically, I noted a few instances [1] [2] [3] of folks not being able to get it to work. Below, I show how this can and does work. I tested all of this using a Windows 7 VM.

Scenario

You want to copy files directly from a Volume Shadow Copy on a live, remote machine.

The Solution

First, figure out when the Volume Shadow Copies were created on the machine in question. A simple way to do this is to run vssadmin list shadows as admin. Let's do this on our localhost to make it simpler; just be aware that there are many other ways to remotely run vssadmin.

 
Output of "vssadmin list shadows." Note the creation timestamps for each VSC.

We have three VSCs: one created on 8/4/2014 07:51:34 PM, one created on 9/19/2016 5:01:19 PM, and one created on 1/31/2017 11:34:16 PM. Let's copy a file from the 9/19/2016 VSC using the proper path syntax -- with specific emphasis on SMB's "previous version token" pathname extension.

Output of commands showing a successful copy operation of one file from a localhost VSC (127.0.0.1).


PS C:\Windows\system32> Test-Path C:\Users\4n6k\readme.txt
False
PS C:\Windows\system32> Copy-Item -Path \\127.0.0.1\C$\@GMT-2016.09.19-23.01.19\Users\4n6k\Desktop\SysinternalsSuite\readme.txt -Destination C:\Users\4n6k
PS C:\Windows\system32> Test-Path C:\Users\4n6k\readme.txt
True


As we can see, the copy succeeded. The Test-Path Cmdlet is initially run in our PowerShell session to show that readme.txt does not exist at the path specified. Once we run our copy operation using the Copy-Item Cmdlet, we can see that this same Test-Path check returns True, indicating that the file now exists.
Note: @GMT Timestamp Format

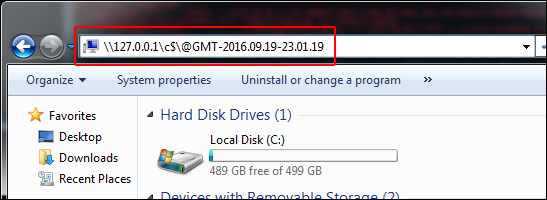
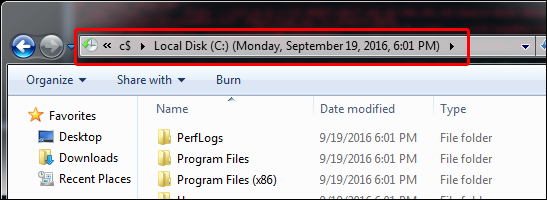
An important item to note is that the timestamp you use in the path must be the VSC creation timestamp in GMT, and it must be in 24hr military time format (i.e. not AM/PM; not your local time). My machine's system time was set to Central (US). Therefore, I had to apply the correct time offset (+6) to get the VSC creation time of 5:01:19 PM Central converted to 23:01:19 GMT. This time has to be exactly correct to the second, or this whole thing won't work at all. Also, fun fact: the offset might be based on your machine's current time zone or DST status and NOT the time zone of when the VSC was created. Note that one of the VSCs' creation times is in September and one is in January. In the Central (US) time zone, September falls within Daylight Savings Time while January does not. Despite this time difference, to copy out the files from each one of these VSCs, I had to apply an offset of +6 to get the correct path and for the copy to succeed. To further prove this point, take a look at what time is displayed when I browse the September VSC with Windows Explorer:

Before pressing Enter:

 
After pressing Enter:


But let's not stop there. Instead of copying just one file, let's copy a whole directory from the VSC.

Output of commands showing a successful copy operation of a directory from a localhost VSC (127.0.0.1).

This copy also succeeded. We can see the contents of the copied SysInternals directory in the destination folder via Get-ChildItem's recursive output.

This is all fine and good, but up to this point, we've just been copying items from our local machine's VSCs. Now that we know that the above process works locally, we should be able to apply it to remote machines fairly easily. So let's do that.

There are many ways to copy/exfiltrate data off of remote machines, but...let's keep it simple. From a separate machine, let's connect to the [now] remote host that contains the VSCs in question using admin creds. Let's also copy readme.txt:

Output of commands showing successful connection to remote host and copy operation of one file from Sept VSC (192.168.1.199).


C:\Windows\system32>net use \\192.168.1.199\C$ /user:4n6k
Enter the password for '4n6k' to connect to '192.168.1.199':
The command completed successfully.

C:\Windows\system32>IF EXIST C:\Temp\Exfil\readme.txt ECHO FILE EXISTS

C:\Windows\system32>copy \\192.168.1.199\C$\@GMT-2016.09.19-23.01.19\Users\4n6k\Desktop\SysinternalsSuite\readme.txt C:\Temp\Exfil
        1 file(s) copied.

C:\Windows\system32>IF EXIST C:\Temp\Exfil\readme.txt ECHO FILE EXISTS
FILE EXISTS


As we can see, a simple connection is made to the remote host using net use (w/ elevated creds), and the readme.txt file from the remote host's September 2016 VSC is copied using the SMB "previous version token" pathname extension.

[UPDATE #01 02/02/2017]: If we want to make the @GMT path lookups even easier, we can run a command line tool called volrest. We don't even have to run it as admin:

Output of unelevated volrest.exe showing @GMT VSC path names on localhost C$ for a specified location, recursively..

It should be noted that you will get more results by running volrest as admin, but you will still be able to identify the @GMT paths and get a good amount as a standard user. There are some key files/directories that will not be shown if you run as a standard user; here's a sampling of some files/folders I couldn't see when specifically querying system32:

Sample of files/folders that were not returned when running volrest.exe across system32 as a standard user.

The command run was .\volrest.exe \\127.0.0.1\C$\Windows\system32 /s. Running as a standard user returned 257 files + 26 dirs; running as admin returned 323 files 49 dirs.

At the end of the day, this technique does work. Can it be used to more easily pull VSC contents for use in forensic investigations? Sure. Could it also be used to exfiltrate data that may otherwise not look to be immediately available on a given machine? Oh yes.

This is a double-edged sword if I've ever seen one.


-4n6k


References
1. SMB @GMT Token
2. SMB Pathname Extensions
3. Reference to Original Tweet 01
4. Reference to Original Tweet 02
5. Reference to Original Tweet 03 - Tools (by Harlan Carvey)

Monday, August 15, 2016

Forensics Quickie: PowerShell Versions and the Registry

FORENSICS QUICKIES! These posts will consist of small tidbits of useful information that can be explained very succinctly.

I was chatting with Jared Atkinson and James Habben about PowerShell today and a question emerged from the discussion: is there way to determine the version of PowerShell installed on a given machine without using the $PSVersionTable PowerShell command? We all agreed that it would be nice to have an offline source for finding this information.

Scenario

You want to determine the version of PowerShell installed on a machine, but don't have a means by which to run the $PSVersionTable PowerShell command (e.g. you are working off of a forensic image -- not a live machine).

The Solution

Right off the bat, Jared suggested that there had to be something in the registry related to this information and subsequently pointed us to the following registry key: HKLM\SOFTWARE\Microsoft\PowerShell. James noted that he found a subkey named "1" inside. Within the "1" subkey is yet another subkey named PowerShellEngine. As we can see in the screenshot below, there is a value named PowerShellVersion that will tell us the version of PowerShell installed on the machine.

 Note that PowerShell version 2.0 is shown in this registry key

There was a nuance, however. While James was only seeing one subkey (with the name "1"), I was seeing another subkey in addition to "1." I also saw a subkey named "3" on my machine. I took a look to find the following:

 A second subkey named "3" shows a different, more recent version of PowerShell

We wondered what this could mean. It wasn't until Jared noted that having the "1" subkey would indicate the existence of PowerShell v1 or v2 and that having the "3" subkey would indicate PowerShell v3-5 that this all started to make more sense.

James's machine was a Windows XP workstation. My machines were Windows 10 workstations. Therefore, James's SOFTWARE hive only had a single "1" subkey. It only had PowerShell v2 on it. But why did the Windows 10 workstations have both a "1" subkey and a "3" subkey? Jared, once again, suggested that a previous version of Windows being upgraded to Windows 10 may have been the reason. Sure enough, I had upgraded my Windows 7 machines to Windows 10 and had NOT done a fresh Windows 10 install. Note that this may not be the reason for seeing both subkeys; I reviewed a machine with a fresh Windows 10 install and observed that it also had both subkeys.

The bottom line is that, yes, the version of PowerShell can be found in the registry and not just by running the $PSVersionTable PowerShell command. But keep in mind that you might find more than one registry key containing PowerShell version information.
Note: Beware the PowerShell.exe Location

Do not be fooled by the default location of PowerShell.exe. The executable's path will show %SystemRoot%\system32\WindowsPowerShell\v1.0\powershell.exe. Unless manually changed, this path will show "v1.0" regardless of the PowerShell versions installed on the machine.


Extras

Great! We solved our problem. But what about some of this other stuff we see in the PowerShellEngine subkey? What's that RuntimeVersion value and why doesn't it match the PowerShellVersion value? If two PowerShell engines exist on the Windows 10 machines, how do I use the older, v2 engine instead of the v5 engine?

To answer these questions, let's first use the easiest way possible to determine the version of PowerShell installed on a machine: the $PSVersionTable PowerShell command. (I ran everything below on the Windows 10 machine).


PS C:\Users\4n6k> $PSVersionTable

Name                           Value
----                           -----
PSVersion                      5.0.10240.16384
WSManStackVersion              3.0
SerializationVersion           1.1.0.1
CLRVersion                     4.0.30319.42000
BuildVersion                   10.0.10240.16384
PSCompatibleVersions           {1.0, 2.0, 3.0, 4.0...}
PSRemotingProtocolVersion      2.3


First, I looked to see if there was an easier way to figure out what all of this output meant. And, what do you know, a quick Google search and ServerFault answer were able to point me in the right direction. Instead of looking at the help files in a PowerShell session, I just looked up what I needed online here. We come back with this:
  • CLRVersion: 
    • The version of the common language runtime (CLR).
  • BuildVersion: 
    • The build number of the current version.
  • PSVersion: 
    • The Windows PowerShell version number.
  • WSManStackVersion: 
    • The version number of the WS-Management stack.
  • PSCompatibleVersions: 
    • Versions of Windows PowerShell that are compatible with the current version.
  • SerializationVersion:  
    • The version of the serialization method.
  • PSRemotingProtocolVersion: 
    • The version of the Windows PowerShell remote management protocol.
And there you have it. Full explanations of what we're looking at here.
Note: CLRVersion & RuntimeVersion

Notice that when we run the $PSVersionTable command, we see a line named CLRVersion. The value associated with this name is the same as the value that we see when we look in the registry at the RuntimeVersion value. This is because both of these entries are related to the "Common Language Runtime (CLR)" used in the .NET Framework. You can read more about that here. Since I'm using Windows 10, I have .NET 4.6, which uses CLR version 4.0.30319.42000.


So, what about the two PowerShell engines that exist on my Windows 10 machines? What if I want to use a different engine than v5? Well, it's as easy as running a PowerShell command. To quote this MSDN article:

"When you start Windows PowerShell, the newest version starts by default. To start Windows PowerShell with the Windows PowerShell 2.0 Engine, use the Version parameter of PowerShell.exe. You can run the command at any command prompt, including Windows PowerShell and Cmd.exe.

PowerShell.exe -Version 2

Let's give it a shot.


PS C:\Users\4n6k> $psversiontable
Name                           Value
----                           -----
PSVersion                      5.0.10240.16384
WSManStackVersion              3.0
SerializationVersion           1.1.0.1
CLRVersion                     4.0.30319.42000
BuildVersion                   10.0.10240.16384
PSCompatibleVersions           {1.0, 2.0, 3.0, 4.0...}
PSRemotingProtocolVersion      2.3

PS C:\Users\4n6k> PowerShell.exe -Version 2
Windows PowerShell
Copyright (C) 2009 Microsoft Corporation. All rights reserved.

PS C:\Users\4n6k> $psversiontable
Name                           Value
----                           -----
CLRVersion                     2.0.50727.8669
BuildVersion                   6.1.7600.16385
PSVersion                      2.0
WSManStackVersion              2.0
PSCompatibleVersions           {1.0, 2.0}
SerializationVersion           1.1.0.1
PSRemotingProtocolVersion      2.1


As you can see, our PowerShell session is now using the v2 engine instead of v5. Note that when I tried PowerShell.exe -Version 3, the output I received was the same output I received for v5. This may be due to jumping from PowerShell v2 on Windows 7 to PowerShell v5 on Windows 10. This could also be because of the split between v1/v2 and v3/v4/v5 (thanks to James and Jared for this possible explanation).

A big thanks goes out to Jared Atkinson and James Habben. This post wouldn't exist without their involvement and discussion.

-4n6k


References
1. What do the contents of PowerShell's $PSVersionTable represent? (ServerFault)
2. Common Language Runtime (CLR)
3. MSDN: about_Automatic_Variables - PowerShell
4. Environment.Version Property (.NET)
5. Starting the Windows PowerShell 2.0 Engine